Monday, April 16, 2012

CREATE THIS: photo inspired DIY challenge: Mr. & Mrs. Wedding Banner

Our Inspiration Photo

The photo that launched a thousand ships or so the story goes! I spotted this gorgeousness when nosing around the wedding web the other day. I fell head over heels in love with the Mr. and Mrs. banner idea and it totally inspired me to get out the DIY tools just to see if I could figure out how to make it.  Why? Because DIY wedding projects are economical, practical, and just plain fun!  Plus, I am a craftaholic and I need a little fix.  Thus was born: 

{CREATE THIS: photo inspired DIY challenge}


Photographers capture so many wonderful, imaginative wedding DIY projects, from banners to decor, flowers to favors, even handmade dresses for the super adventurous. And thankfully so because we will need a fabulous new inspiration photo for our next installment of CREATE THIS, which will be a regular category here on dLA. BETTER YET, what photos are inspire YOU? Issues a challenge to the Creative Department here at dLA and send your best photo inspired DIY idea!


 Mr. and Mrs. Wedding Banner:


This project is actually pretty easy when you have the right tools. You will need:
- black paint
- craft paper, cardstock
- letter stencils
- scissors
- ruler
- ribbon
- plastic bag
- paper clips

1. Cut craft paper or cardstock into the size you want.  I created 6 x 7 rectangles to correspond with the size of my stencils. I actually created my own stencils but you can purchase pre-cut stencils at any craft store.

2. Paperclip one of the letter stencils to your rectangle. Practice with centering the letter if the sizes aren't the same.


3. Pour out a small amount of black paint into some throw away container. (I used the top of a butter tub.) Make sure your table and clothes are protected.


4. Scrunch up a small section of the plastic bag, maybe 2 inches or so, and dip lightly into the paint. Dab off the excess on a scrap piece of paper.

5. Very gently tap the paint into the stencil, holding down the edges with your finger to keep from smudging the lines. Use protection around the edges if the stencil is smaller than your paper.
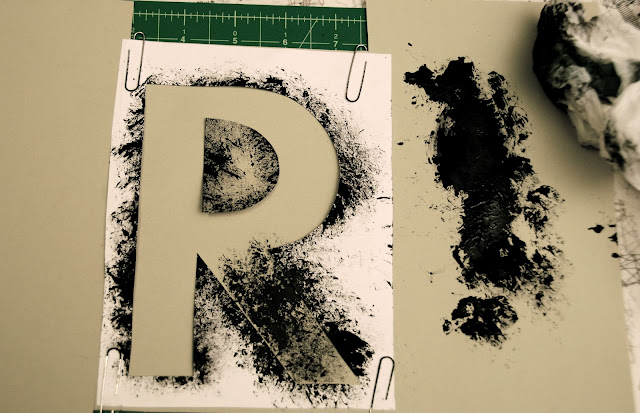

 ( I know the picture looks sort of gross!)

6. Repeat 5 until the entire letter is filled in, paying particular attention to the edges. My letters were trial and error and have a few smudges on them from wayward paint and plastic bag!


7. Let each letter dry. In the top corners, make a small vertical cut, the same size as you ribbon (my ribbon is half inch) about an inch or so away from the edge.


8. Pass your ribbon through the cuts to make the sign and VOILA, you have now recreated the inspiration photo wedding banner!


Photos by M. de Oliveira

What I love about weddings is that they are full of possibilities and imagination; anything you see or dream can be your reality! So when you come across a must have decor idea, have a flower fantasy, and find a to die for favor, remember that it can done with a little time, patience and brain power! Or just send us your inspiration photo and we can figure it out for you!

Happy Planning, happy crafting,


PS: If you like what we do here, we'd appreciate it if you would LIKE us on FACEBOOK and FOLLOW us on TWITTER! We have great conversations going over there that you won't want to miss!

No comments:

Post a Comment

Leave us a comment and let us know what you like!

Related Posts Plugin for WordPress, Blogger...